DaVinci Resolve 21 turns Blackmagic Design's free editor into a single app for both still photos and video. The headline addition is a new Photo page that connects directly to Resolve's node-based Color page, so the same grading engine that colors feature films now works on RAW stills. This guide walks through a complete hybrid shooter workflow: import a RAW photo shoot, grade it on the Photo page, match those grades to video from the same project, and export both, in about 60 minutes, using the free build or the one-time $295 Studio license.
The release shipped on June 3, 2026, and reviewers called it one of the largest updates in the software's history. For photographers and hybrid shooters who currently bounce between a stills editor and a video editor, the practical question is simple: can one app actually replace that two-tool setup? Below is the workflow to test it on your own footage.
What You Need
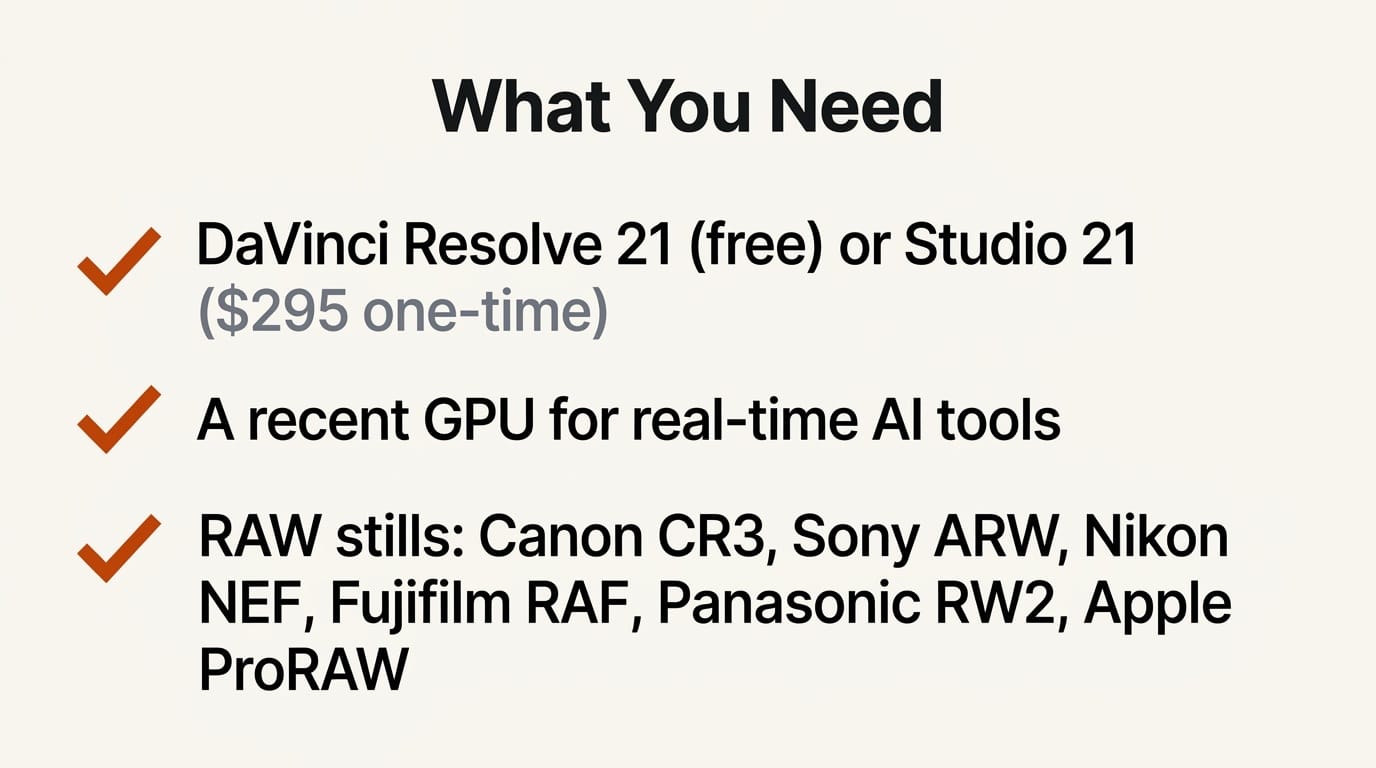
- DaVinci Resolve 21 (free) or DaVinci Resolve Studio 21 ($295, one-time), downloaded from the Blackmagic Design product page
- A computer that meets the minimum spec (a recent GPU helps the AI tools run in real time)
- A set of RAW stills. Resolve 21 adds native decoding for Canon CR3, Panasonic Lumix RW2, Fujifilm RAF, and Apple ProRAW, plus compressed Sony ARW and improved Nikon NEF handling
- Optional: video clips from the same shoot, so you can color-match stills and motion
- Optional: an existing Adobe Lightroom catalog, which the Photo page can import directly
The Workflow: Stills and Video in One Project
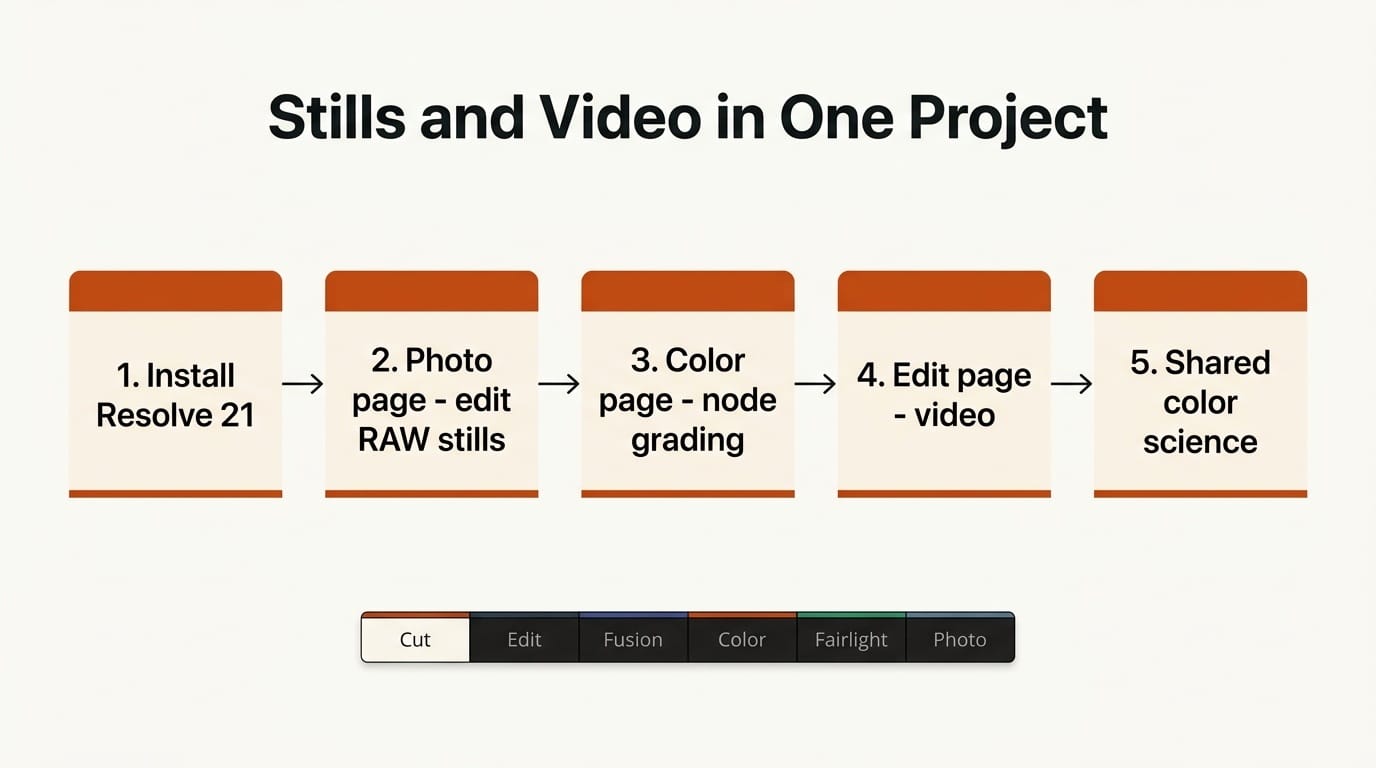
Step 1: Install Resolve 21 and create the project
Download and install the free build, open the Project Manager, and create a new project. Set the timeline resolution and frame rate to match your video footage (for example, 3840x2160 at 25fps). The Photo page lives alongside the familiar Cut, Edit, Fusion, Color, Fairlight, and Deliver pages, so a single project now holds both stills and video. If you are coming from Lightroom, use File > Import > Lightroom Catalog to bring your existing albums and metadata across in one pass.
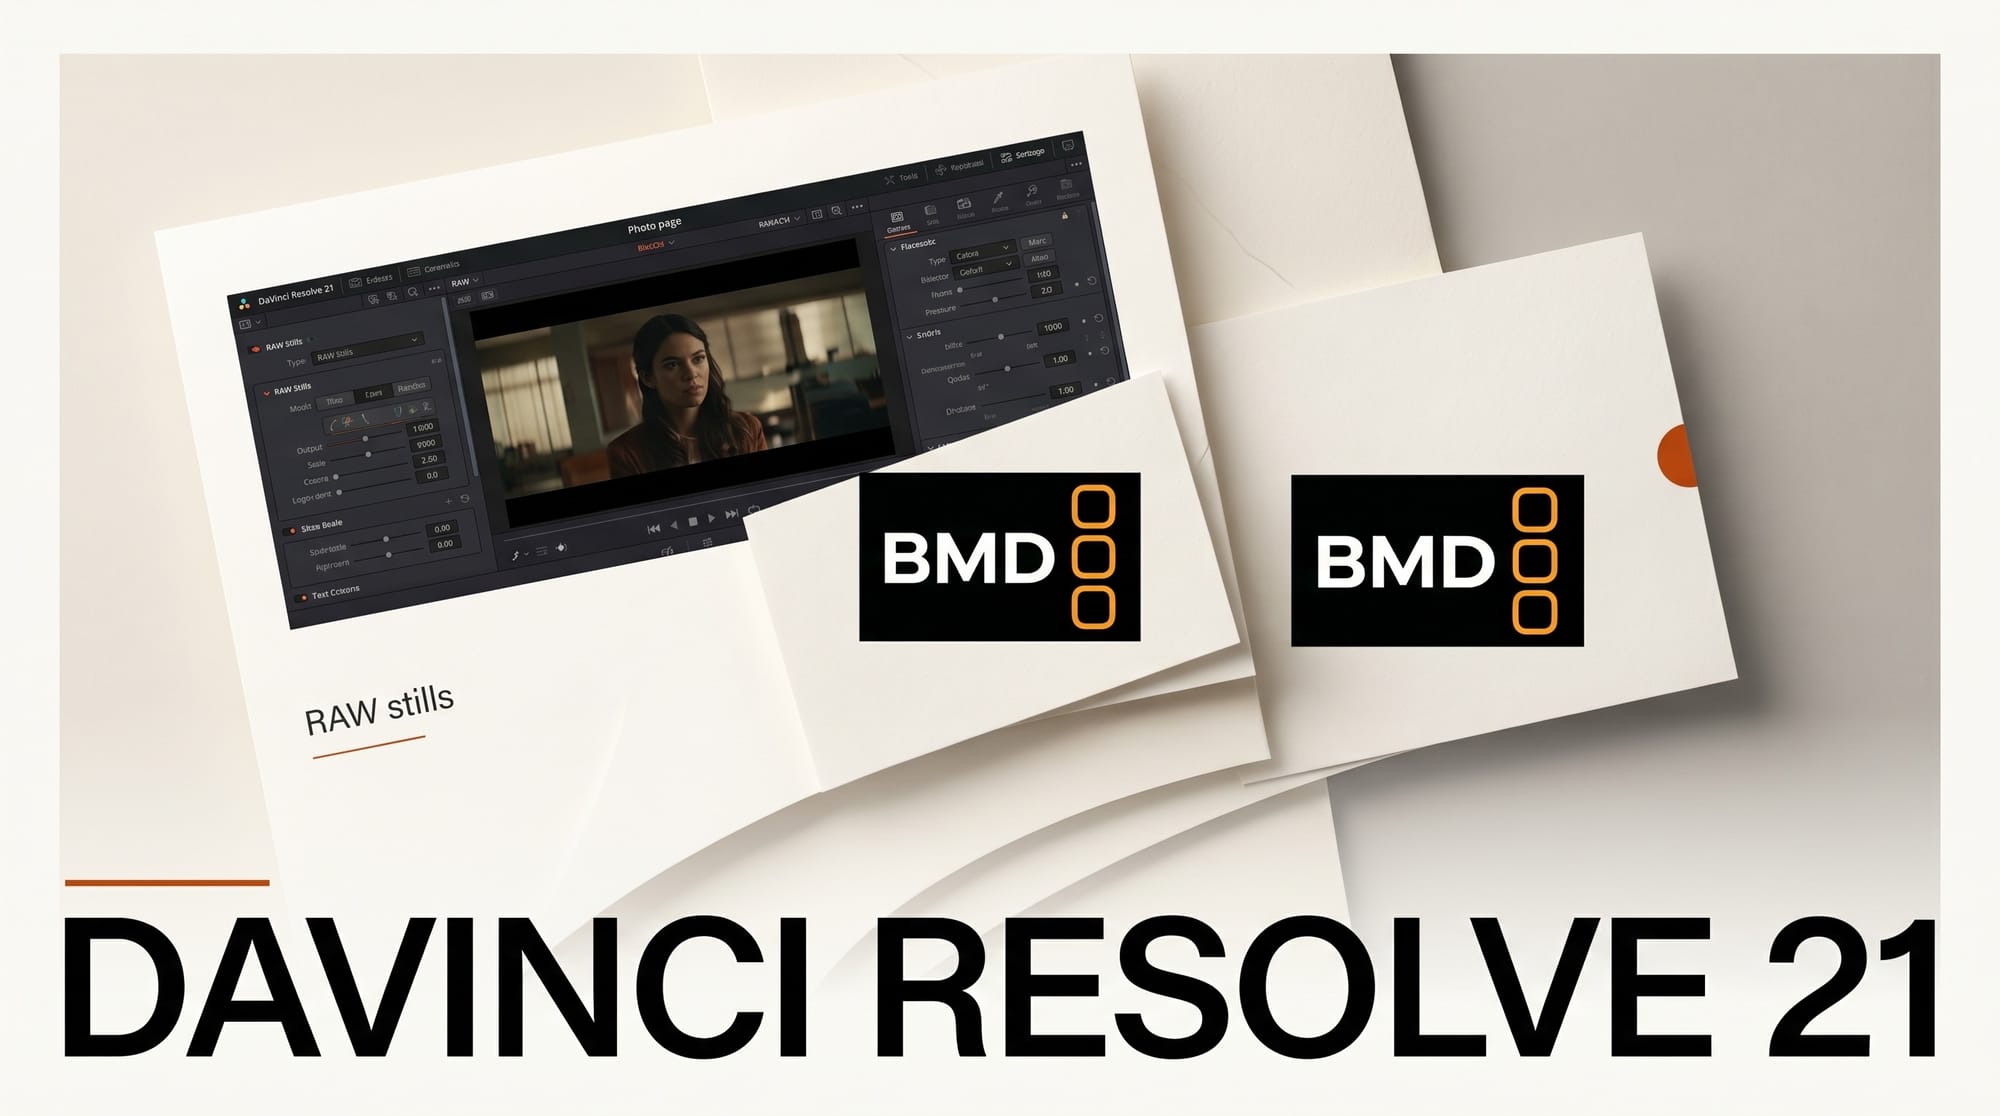
Step 2: Import RAW stills into the Photo page
Switch to the Photo page and drag your RAW files into an album. Because decoding is native, Canon CR3, Sony ARW, Nikon NEF, Fujifilm RAF, Panasonic RW2, and Apple ProRAW files open without a separate converter. The Photo page organizes images into albums for shoot-by-shoot management, and each image inherits Resolve's wide internal color science rather than a baked-in camera JPEG profile. Start by culling: flag your selects so the grading pass only touches keepers.
Step 3: Grade a still with the node-based Color tools
This is the step that separates Resolve from a conventional photo editor. Select an image and open its grade. You get the full node editor: primary correction, curves, qualifiers, and power windows, the same controls colorists use on the Color page for video. Build a node tree the way you would for a clip. Use a primary node to set white balance and exposure, a qualifier node to isolate skin tones, and a power window to draw attention to your subject. Because it is node-based rather than slider-based, you can stack and reorder corrections non-destructively and copy a grade across an entire album.
Step 4: Apply the new AI tools where they earn their place
Resolve 21 adds a batch of AI tools, and a few are genuinely useful on stills. CineFocus lets you adjust focal emphasis after capture, clicking a region to refine where attention falls and tuning the apparent aperture and focal range. The portrait set, Face Reshaper, Face Age Transformer, and Blemish Removal, handles retouching that would otherwise mean a round trip to Photoshop. On the video side, IntelliSearch analyzes your media so you can search for people, objects, or spoken keywords in dialogue, which matters once a project holds hundreds of clips. Use these selectively: they are accelerators, not a substitute for a deliberate grade.
Step 5: Match photo grades to video from the same shoot
Here is the payoff for hybrid shooters. Because stills and clips share one project and one color science, you can grab a still that already has the look you want, copy its grade, and paste it onto a video clip on the Color page (or do the reverse). Build a single LUT or a still that defines your campaign look, then apply it across both the photo deliverables and the motion deliverables so a brand shoot is consistent end to end. This is the workflow that two separate apps make painful, because each maintains its own color pipeline.
Step 6: Export stills and video with consistent color
Export photos directly from the Photo page in your chosen format and color space. For video, move to the Deliver page and render your timeline as usual. Keep the same output color space across both so the campaign reads as one body of work. If you are delivering to a client who also edits, Resolve reads and writes common interchange formats, so handoff does not lock the project to Blackmagic's ecosystem.
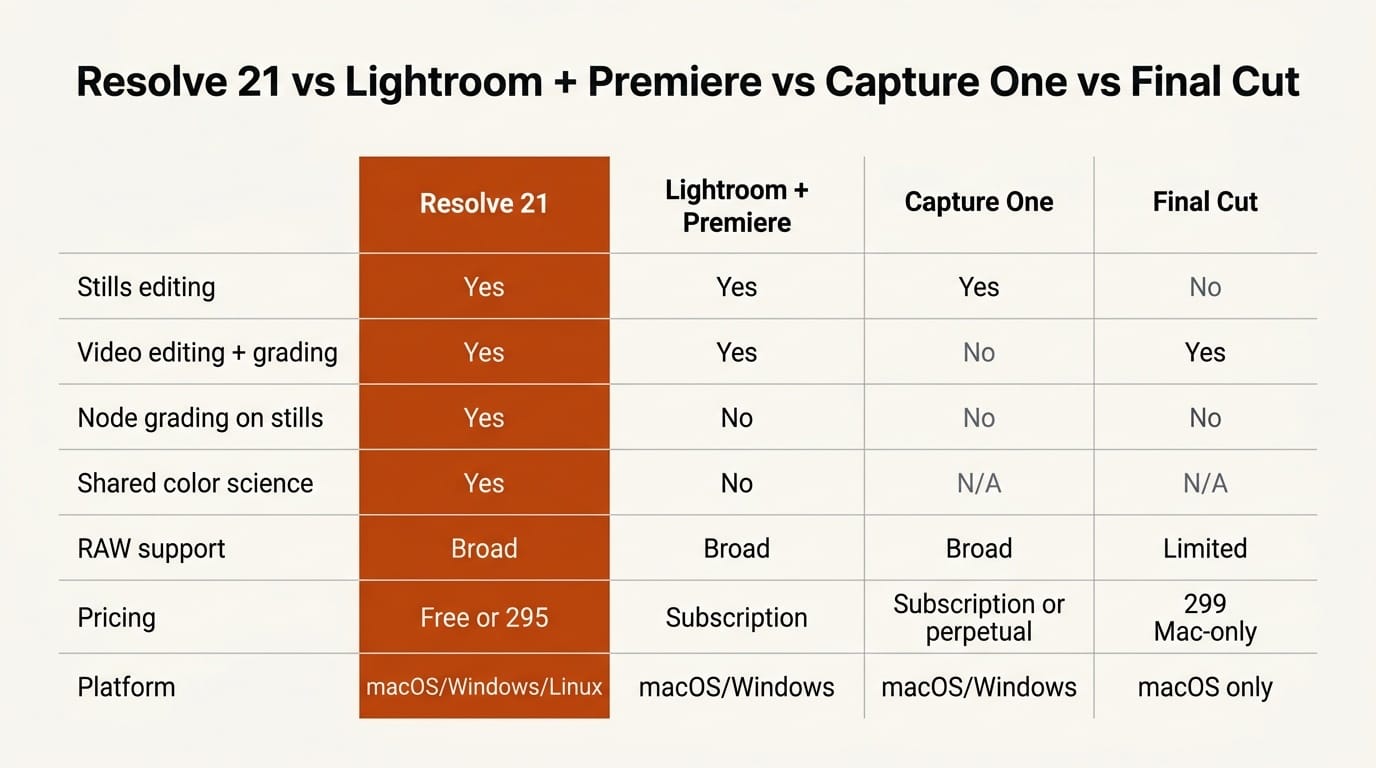
DaVinci Resolve 21 vs Lightroom Plus Premiere vs Capture One vs Final Cut Pro
The one-app approach is not automatically the right call. Dedicated tools still win in their lanes: Capture One remains a tethered-shoot and color-fidelity favorite for studio photographers, and Final Cut Pro is a fast, Mac-native editor that many video creators prefer. Here is how the stacks compare for a creator who shoots both stills and video:
| Capability | Resolve 21 | Lightroom + Premiere | Capture One | Final Cut Pro |
|---|---|---|---|---|
| Stills editing | Yes (Photo page) | Yes (Lightroom) | Yes (stills only) | No |
| Video editing and grading | Yes (full NLE + color) | Yes (Premiere) | No | Yes |
| Node-based grading on stills | Yes | No | No (layer-based) | No |
| Shared color science across photo and video | Yes | No | N/A | N/A |
| RAW support | Broad native (CR3, ARW, NEF, RAF, RW2, ProRAW) | Broad | Broad | Limited |
| Pricing | Free, or $295 one-time (Studio) | Subscription (ongoing) | Subscription or perpetual | $299 one-time (Mac only) |
| Platform | macOS, Windows, Linux | macOS, Windows | macOS, Windows | macOS only |
The reason this release drew attention from outlets like PetaPixel and CineD is the pricing column. A free tier that covers both stills and video, with a $295 ceiling for the pro features, directly pressures subscription stacks where photo and video are billed separately and forever. In its review of the release, TechRadar singled out the Lightroom-style Photos tool as the change most likely to pull photographers into Resolve.
Troubleshooting
- RAW files look flat on import. That is expected: you are seeing scene-referred data, not a camera JPEG. Add a primary node and pull your white balance and contrast on the grade rather than expecting a baked look.
- AI tools stutter or render slowly. CineFocus and the portrait tools lean on the GPU. Lower the timeline preview resolution while you work, or confirm your GPU drivers are current. Some AI features and higher output resolutions are gated to the paid Studio build.
- A Lightroom catalog imports without edits. Resolve brings images and metadata across, but Lightroom's develop adjustments do not translate one-to-one into Resolve's node model. Treat imported images as fresh RAW and regrade, rather than expecting a pixel-identical match.
- Project file will not open in an older Resolve. Version 21 uses an updated project format. Keep a backup before upgrading a shared project, since older installs cannot open a v21 project.
- Free vs Studio confusion. Many features are in the free build, but a subset of AI tools, higher-resolution output, and some collaboration features require Studio. Check the feature against the official feature list before assuming the free tier covers it.
What to Try Next
Once the core loop works, push it further. Build a reusable LUT from your best still grade and apply it to an entire video timeline for instant brand consistency. Try CineFocus on a shot where you missed focus slightly, then judge whether the result holds at full resolution before you rely on it for client work. If your bottleneck is GPU performance on the AI tools, our guide on prepping a creative app for NVIDIA RTX Spark covers the same hardware tuning that speeds up Resolve. And if you are weighing timeline editors against newer canvas-based tools, see how Bloc replaces the traditional video timeline for a very different editing philosophy.
Frequently Asked Questions
Is DaVinci Resolve 21 really free for photo editing?
Yes. The Photo page and node-based grading are in the free build of DaVinci Resolve 21. A subset of AI tools, higher-resolution output, and some collaboration features require the $295 one-time Studio license, but the core stills-and-video workflow runs on the free version.
What RAW formats does the new Photo page support?
Resolve 21 adds native decoding for Canon CR3, Panasonic Lumix RW2, Fujifilm RAF, and Apple ProRAW, plus compressed Sony ARW support and improved Nikon NEF handling, covering the major mirrorless and DSLR systems.
Can it replace Adobe Lightroom?
For grading, organizing, and exporting RAW stills, the Photo page covers the core Lightroom workflow and can import an existing Lightroom catalog. The trade-off is the learning curve: Resolve uses a node-based grading model rather than Lightroom's sliders, so the controls feel different even when the results are comparable.
Does the Photo page use the same color tools as video?
Yes, and that is the point of the release. The Photo page connects to Resolve's node-based Color page engine, so stills get the same primaries, curves, qualifiers, and power windows that colorists use on video clips, and a grade can be matched across both.
What are the standout new AI tools in Resolve 21?
The most useful for creators are CineFocus, which adjusts focal emphasis after capture, IntelliSearch, which finds people, objects, and spoken keywords across your media, and the portrait set (Face Reshaper, Face Age Transformer, and Blemish Removal) for retouching without a round trip to another app.